Project 5: Basic Types & Their Use – Part I

Dear reader,

Thank you for visiting my page once more. Today I will focus on the pure basics of the Python programming language. I will explain the different types there are in Python and what they are used for. Until this point I realized that I have not actually tried to understand the language of Python. Most times I just picked a random topic and started to write about it without actually trying to understand what I am doing. This starts NOW.

In Python, everything is an object. Each object is classified into different kinds of things. The way these objects are classified is to call them different classes or data types.

The main, so-called, native datatypes that are preinstalled in Python will further be explained one after another (this is only Part I of this series):

  • Strings

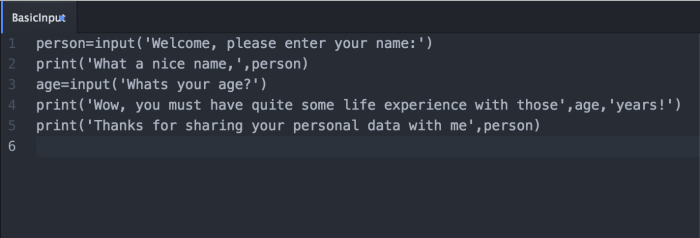
Strings (denoted as ‘str‘, sequence of letters) are surrounded by quotation marks (single ‘, double ” or triple ”’ quotes).
The reason for this is, that when e.g. printing a sentence using an apostrophe (as is “I’m smart”), Python would confuse the single quotes. Thus, you would surround the string with double quotes.
(The same works the other way around: When you want to e.g. quote someone, use ‘ single quotes. Additionally, use triple quotes when framing a longer string.)

Bildschirmfoto 2016-08-31 um 19.54.19

  • Numbers (integers, floats)

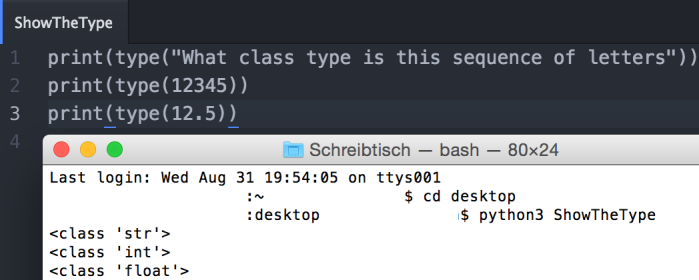
Numbers are, of course, also often used within programs. In Python numbers are either classified as ‘int’ or ‘float’.
– ‘int‘ meaning integer numbers (like 1,2,3..)
– ‘float‘ numbers with a decimal point (like 1.25)

Python actually lets you find out what type a certain object is using the ‘type’ function.
See below:

Bildschirmfoto 2016-08-31 um 20.24.56

  • Boolean (True/False)

Booleans are either True or False. There are two constants installed within Python which can be used to assign boolean values directly. In places like ‘if’-statements the Python program expects a reference to compare to a ‘boolean value’. In these places, called ‘boolean contexts’, any expression can be used and then Python determines its truth value. Each data types discussed in this article have different values that can be proven True or False.

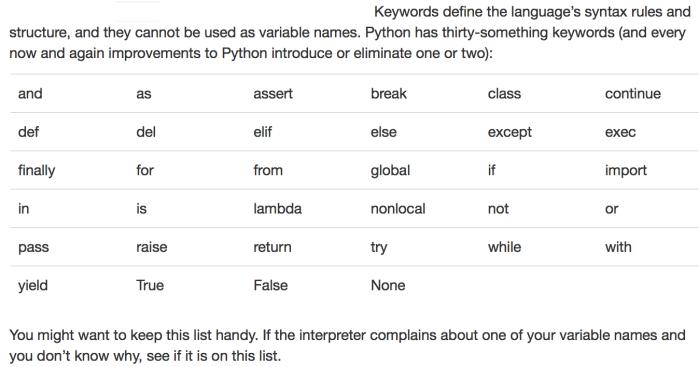
I now add a list I value useful regarding the different operators (‘blocked objects’) installed within Python – True & False are two of them:

Bildschirmfoto 2016-09-01 um 01.05.15

Continuing on Boolean types, I will explain it by using an if-scenario. See the following program in order for me to explain:

Bildschirmfoto 2016-09-01 um 10.38.24

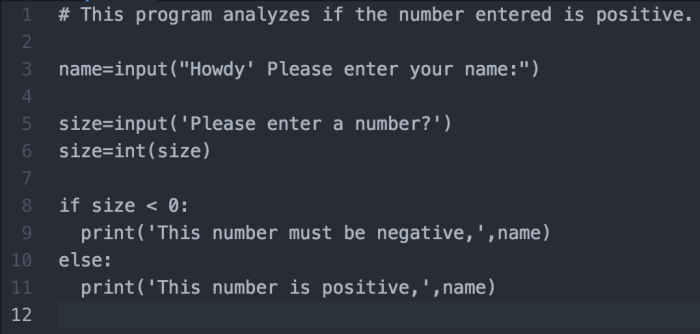
In this program I assigned the ‘size’ variable as an integer in line 6. Before, I asked the user to enter their name and a number of their choice. The program will then test if the number  entered is positive or negative. It does so by using the if-operator. The ‘if’ part in line 8 checks, if the variable (size) is smaller than (<) Zero (0). If this holds true, I ask the program to display to the user that the number given must be negative. When this is not the case, the ‘else’ operator will display that given number must be positive.
This is the logic behind Booleans.

If there are any questions remaining. Let me know!!

Best,

James de Tec


Sources:

http://www.tutorialspoint.com/python/python_variable_types.htm

http://www.diveintopython3.net/native-datatypes.html

Project 4: Comments (Correcting myself)

In my first project, I was of the belief that a comment within Python simply means using the ‘print’ function within Python. As I read along the interactive book we were given, I realized that this function simply helps to display a value on the screen.

Regarding the use of comments, I will try to give a more clear picture on this topic today.
Comments can simply be described as notes to your program. These notes become necessary once a program gets complicated. Thus, comments are used to help the reader understand the meaning of some parts of your code. These comments are completely ignored by the computer when the program is run.

To make use of a comment within your code, simply enter

# In the beginning of the line
# These lines will then be ignored by the interpreter

I hope you were not completely confused by my previous explanation on comments. In my future programs I will try to use comments in order to help the human reader understand my train of thought.

Project 3: Zen of Python

Hey there!
Today, I have the pleasure to introduce you into my third Mastery topic, namely ‘Zen of Python’. When I first looked it up I had no idea what I would have to program for this but after some time I realized, that not what the Zen of Python is about.

Actually, the Zen of Python is basically the bible for all programmers using Python. According to different sources, this bible includes 20 software principles, of which 19 were written and published by a well-known Python guru called Tim Peters in 1999. For you to have a look at, I will copy and paste all 20 principles below:

Bildschirmfoto 2016-08-25 um 11.02.20

All of these lines have a meaning and Tim Peters felt like these rules and recommendations can help any programmer using Python to code in a better way. For a really helpful summary that explains to you step by step the meaning of each sentence, make sure to visit the following link: MEANING OF SENTENCES

Additionally, there is an Easter Egg included into the software code of Python3. Whenever you enter the terminal of your device, you are able to open up the “pop-up” menu of python by just typing ‘python3’. After that you can simply type ‘import this’ and you will be shown the whole Zen of Python as written above!

Bildschirmfoto 2016-08-29 um 10.22.52

Hit me up for any questions!
Until next time #TC101 😉


Project 2: Basic User Input

For the second program I chose to build directly on the basic output covered in the first tutorial. This is why I chose to dig deeper into one of the mastery topics called Basic User Input. Here, I learned how to run a program that allows the user to enter their own information.

The first basic input was to programm the possibility of entering a name. This can be done by typing:
person= input(‘Welcome, please enter your name:’)
print(‘Thank you’, person)
– By typing this, the program will then give the output: Thank you, (e.g.) James.

So basically, I decided the term “person” to be taking on the different names to be entered into the system. In the next step I added the input of age into the Atom window. This way it is easily possible to build up a conversation with the person who enters the program. I could do this further and add further variables for the basic input but this gives quite a good overview on the topic already.

Bildschirmfoto 2016-08-22 um 11.02.15

Additionally, here is a quick explanation to all of you on how to open the files through the terminal on a Mac:
– Create a draft & edit it whenever you want.
– Save it to any directory (I always choose desktop for the sake of simplicity)
– Open ‘Terminal’ on Mac
– Type ‘cd’ (short for change directory) + ‘Desktop’ (the directory where you saved the draft)
– Type ‘python3 ____’, where ____ should be the file name
– Terminal runs the program

Bildschirmfoto 2016-08-22 um 11.02.52

Sources:

http://anh.cs.luc.edu/python/hands-on/3.1/handsonHtml/io.html

First Python project: Absolute Beginner

Today in class I started to get into the spheres of the programming language called “Phython”. Compared to other programming language such as Java or C++, Python is known to be  more of a general-purpose tool and thus perfect for total beginners like I am.

By the way: for any of you interested in widening their musical spectrum and those of you who would like to see more of my hometown, make sure to check out the following HipHop song by one of my favorite Germany rap groups (Their name really translates exactly to: Absolute Beginners – Exactly the way I feel right now)


Now, let’s get into Python and the first things I learned while using the IDLE software!
I decided to start off with the first major topic on the list which is the ‘Use of comments’. . I started out with programming a single line comment for this blogpost.

The way how to use a single line comment works the following:
You open the IDLE software and type  print(“Hello World“). Here you can see my first output:

Bildschirmfoto 2016-08-17 um 14.06.58

I also tried to figure out how a multiple line comment works but in the end I wasn’t able to do this within my Python 3.5.2. IDLE window. I will ask our tutor Ken next time if he could help me with this.

I hope you liked my first little tutorial and feel free to shoot me some messages via Twitter (@tecjames) or comment on this post if you have any questions!

Sources used for this post:
http://www.afterhoursprogramming.com/tutorial/Python/Comments/
https://www.codecademy.com/en/forum_questions/505ba3cfc6addb000200e33c