BONUS: Course Review #TC101

Dear Reader – Welcome to this blog post where I try to review my experience throughout the Programming course at Tecnologico de Monterrey (Campus Guadalajara).

In the beginning I would like to start with a small exercise:

Close your eyes and think about all the experiences you had when it comes to teachers grading your performances – no matter if it was a presentation, an essay or an exam.
When you think about this, try to focus on the emotions you felt in these moments and maybe ask yourself:
Did I deserve this specific grade? Is a teacher capable to decide how each of their 30 (or more) students has learned throughout the past months and grade them by using multiple choice questions?

Our teacher Ken Bauer probably also faced these questions and in his development as a teacher there must have been a point where he said: Hold on! Isn’t it the task of my students to learn as much as they want to learn and set their limits and ambitions themselves? Shouldn’t they be able to learn in the pace they see fit best with their own time and learning capabilities?

This is how I see the use of the #AbolishGrading policy that our teacher introduced and which I haven’t seen anywhere so far. But after this course I have to ask: Why don’t we see this more often? This policy asks for the students to grade themselves based on a specific rubric, given out to all students before the partial exams. The students are entirely free in the pace they want to work in and the class itself was really interactive because each student had an individual online blog where they were able to cover the 22 so-called mastery topics that Ken identified as the most basic concepts to grasp when one is interested in becoming a programmer.

All in all, I really appreciated the work the Ken has done and the structure of the course! Everyone was always very helpful with any question I might have faced and it was a really productive way of working together.

For further information please have a look at the following video that I recorded for Ken to use in one of his future lectures.

Best,
@tecjames


Project 14: Nesting of conditional statements

This blog post I will be writing about nesting of conditional statements. I feel like this the exact right timing to cover this part of Python programming because by now I have all the abilities to understand and master it sufficiently.

What “nesting” means in the end, is that as programs become more advanced more and more detailed calculations/tasks need to be executed and you start seeing conditional statements “within” each other. For you to be able to write a code that completes more advanced tasks than just the simple if, else/elif statement and/or for and while loops, you have to start learning about nesting.

So far I did not explain exactly how a nested if statement looks – sorry if it took me some time to get to the point. So here we go:
When there is a situation where you want to check for another condition once the first condition resolves true you use a nested if construct. A loop inside a loop, if you will.

NESTED-IF-FLOW-CHART.jpg

(Taken from: http://www.tutorialgateway.org/python-nested-if/)

The syntax looks like the following:

if expression1:
  statement(s)
if expression2:
statement(s)
  elif expression3:
statement(s)
else:
statement(s)
elif expression4:
        statement(s)
else:
statement(s)

See below for an example program:

Bildschirmfoto 2016-10-27 um 01.14.07.png

The output for the given code, if the user enters the number 50:

‘Expression value is less than 200’
‘Which is 50’
‘Good Bye’

And that’s also a Good Bye from me!
I hope you understood all my explanations! If this is not the case make sure to send me a message via @tecjames at Twitter or ask a question in the comment section. I’ll be glad to help 🙂

See y’all soon!

Best,
James de Tec

Sources:

http://www.programiz.com/python-programming/if-elif-else
https://www.tutorialspoint.com/python/nested_if_statements_in_python.htm
http://www.openbookproject.net/books/bpp4awd/ch04.html


Project 13: Use of loops with ‘while’

In this blog post I will be covering the use of loops with the “while” statement. The only difference to a ‘for’ loop (for more information visit my last blog post) is, that the while loop statement executes a target statement when a given condition is true (not just when a lists content is exhausted).

If the condition this is based on turns out to return a False value, then it may happen that the function will not be executed at all or the function continues on using the ‘else’ statement you are able to attach to it.

For a general understanding of these loops have a look at the following flow diagram:

python_while_loop.jpg

The given syntax of a ‘while’ loop always looks like this:

   while expression:
               statement(s)
   else:
               statement(s)

In this example ‘statement(s)’ can be a single statement or a block of statements. Our condition can be any expression. The loop keeps iterating while the condition is true.

For a very simple use of the ‘while’ loop have a look at the following

Bildschirmfoto 2016-10-26 um 19.16.44.png

When you use ‘while’ loops with an ‘else’ statement, the else statement is executed as soon as the condition of the while loop is not met any further.
Have a look at the following code in order to understand this better:

bildschirmfoto-2016-10-26-um-19-42-22

The following output is shown once you execute this program:bildschirmfoto-2016-10-26-um-19-42-30

Thank you for visiting my blog once more and hope you learned something today 😉

For any questions hit me up on Twitter @tecjames or ask any question in the comment section!

Cheers,
James de Tec

Sources:

https://wiki.python.org/moin/WhileLoop
https://learnpythonthehardway.org/book/ex33.html
https://www.tutorialspoint.com/python/python_while_loop.htm


Project 12: Use of loops with ‘for’

After having covered the if statement and the use of else and elif within those statements I feel like I”m getting closer to actually do smarter things with my codes – not just tasks that I would easily be able to solve in my head.

Before I start explaining the logic behind ‘for’ loops – the topic of today’s blog post – I will once more explain how to create and use lists. This is necessary to bring back to mind because you need to store results of the loops you create somewhere.

Lists = Lists are containers of things that are organized from first to last that look like this:

courses = [Programming, Negotiation, Entrepreneurship]
schooldays = [Monday, Tuesday,Thursday,Friday]
(no school on Wednesday’s for me ;))

For further explanation have a look at an earlier blog post (click here) about basic types and their use.

Now to ‘for’ loops:

For loops are traditionally used when you have a piece of code you want to repeat ‘n’ number of times. There alternatively is also the ‘while’ loop that you are able to use within Python. These are rather considered when it comes to conditions to be met and I will be covering this in my NEXT blog post!

For loops run for a fixed amount of variables (compared to while loops that can theoretically run forever). Any object whose data can be represented in list form (also called ‘objects with an iterable method’) can be used in a ‘for’ loop. When for loops are used you are also able to create a list containing an amount of numbers (defined by the input) by using the “range” function.

Have a look at the following flow diagram to understand further how ‘for’ loops can be useful:

python_for_loop.jpg

Thus, a general syntax of a ‘for’ loop is:

for   variable   in   sequence:
         statement(s)
else:
         statement(s)

Have a look at the following code to understand further how ‘for’ loops are used:

Bildschirmfoto 2016-10-26 um 18.56.42.png

What you should see after executing this code:Bildschirmfoto 2016-10-26 um 18.55.27.png

When using an ‘else’ statement with a ‘for’ loop, the else statement is used once the loop has exhausted iterating the given list.
Have a look at the following to understand this:

Bildschirmfoto 2016-10-26 um 18.42.55.png

For additional uses of the ‘for’ loop visit this website:
https://wiki.python.org/moin/ForLoop
_
_____________________________________

That’s all there is to cover about ‘for’ loops. Make sure to visit my blog later today for more information on ‘while’ loops & nested loops!!

See ya later, aligator!
@tecjames

Sources:

https://learnpythonthehardway.org/book/ex32.html
https://wiki.python.org/moin/ForLoop
https://www.tutorialspoint.com/python/python_for_loop.htm
http://www.python-course.eu/python3_for_loop.php


Project 11: Use of ‘else’ (& elif)

Today I will explain to you when and how to make use of the “else” statement & the use of “elif”.

The else statement is usually combined with an if statement. The coded block following the ‘else’ is only regarded and executed by the program if the previously stated “if” statement (for further information visit my last blog post) resolves a 0 or a FALSE value.

It is built up like this:

        if expression:
                statement block for TRUE condition
        else:
                statement block for FALSE condition

Have a look at this flow diagram that visually explains the functioning of if & else:

if_else_statement.jpg

(Taken from: https://www.tutorialspoint.com/python/python_if_else.htm)

For this post I set myself the challenge to combine a conditional ‘if’ statement with ‘else’ and define this operation as a function, to that theoretically I will be able to use this function once more in the future if I’m in need of it.

I found an exercise online  that asked me to design a program that asks the user to enter both his usual wage per hour and the hours he/she had worked in the month before. The program I then created was supposed to calculate the monthly wage including the second option of working overtime, where the worker would be paid twice the usual amount.
(for more exercises visit: http://anh.cs.luc.edu/python/hands-on/3.1/handsonHtml/ifstatements.html)

Have a look how I solved this problem below:

Bildschirmfoto 2016-10-25 um 16.20.11.png

bildschirmfoto-2016-10-25-um-16-19-57

If you do the math, you will see that the calculations are correct either way (if there is overtime and if there is none). In my opinion this task really helped me to refresh my knowledge on defining functions, as well as make use of the newly acquired knowledge regarding the use of the conditional if & else.

There are often also situations where you need to distinguish not only between two options, like in the example used above. This is where the use of ‘elif’ comes into play!

In the straightforward example below, the grade that is obtained in a course would be entered into the system and the output would be the ‘letter’ this grade would result to if we were studying in the US.

Bildschirmfoto 2016-10-25 um 16.46.20.png

Because it is overcomplicating things A LOT and making your whole program look fairly messy (remember the Zen of Python 😉 ) the use of ‘elif’ allows you to just code this program like this:

Bildschirmfoto 2016-10-25 um 16.51.03.png

Therefore, the usual syntax how a conditional use of if, combined with elif and else would look like this:

       if condition 1:
                statement block for True condition 1
       elif condition 2:
                statement block for True condition 2
       .
       .
       else:
                statement block for each condition false


This completes my blog post about the use of ‘else’ and ‘elif’. If you have any questions make sure to comment or write me on Twitter @tecjames.

See y’all!

Peace,

James de Tec

For further help make sure to watch this video:


Sources:

https://docs.python.org/3/tutorial/controlflow.html
https://www.tutorialspoint.com/python/python_if_else.htm
http://anh.cs.luc.edu/python/hands-on/3.1/handsonHtml/ifstatements.html
https://learnpythonthehardway.org/book/ex30.html


Project 10: Conditional If-Statement

Within Python it will be useful very quickly to begin adding some degrees of logic to your program. One of the tools you have to add logic is the conditional If-assignment.

The basic logic behind the If statement is the following:

  • The program checks if something is the case
  • if it is the case: do something
  • – otherwise: continue, don’t do anything

Use of assignment operators within If:

x = 5
y = 8
if x > y:
        print(‘x is greater than y’)

If you run this program nothing will happen. Why?
Well, as I have just explained, if the condition within the If statement is not fulfilled (see here: 5 is not greater than 8) Python continues the program and chooses to ignore the If condition. When we now change the numbers to x=8 and y=5, the code is going to print ‘x is greater than y‘.

Just as the usual < and > signs, we are also able to add other assignment operators that work just as well (e.g. <= ; >=). One of the only exceptions would be the = sign where we have to use ‘==’ because the usual ‘=’ we know from mathematical calculations is already used within Python when using a variable definition.

Thanks for visiting my blog once again. Feel free to ask any questions within the comment section or hit me up at Twitter @tecjames.

For a list of all operators to be used within Python visit the following website:
https://www.tutorialspoint.com/python/python_basic_operators.htm

Best,

James


Project 9: Libraries/Modules

Modules within Python are used, when you want to access a good code or functions defined earlier within a new code. If modules/libraries are not created, usually all functions and variables that you had in the interpreter will get lost. Thus, programmers are advised to use different modules to access in their codes by ‘importing’ them. A module contains definitions and statement.

To create a module a ‘script’ has to be created (on any text editor) which then has to be saved under a file name ending .py . When you wish to use this module within one of your programs, you need to add this to your program, before making use of the module:

import module_name

Once the module is imported, you are able to call the functions used in the original module by typing:

module_name.function_name

When you wish to access different functions of a module directly you can also type:

from module_name import function_name

This part below describes quite well how a module is imported and used again after being saved as such:

bildschirmfoto-2016-09-15-um-01-25-10

Thanks for reading this blog post.
If there are any questions remaining, please comment or hit me up on Twitter!

See ya,
@tecjames


Sources:
https://docs.python.org/3/tutorial/modules.html

Project 8: Defining Functions

As I have covered in my last blog posts, Python has several built-in functions that can be called repeatedly to make your program run & look smoother. Today I will cover those functions created by users (user-defined functions), meaning ME & YOU:

How to define a function:?

Functions are created by (1) using the keyword def, followed by the function name and parentheses ( ). Inside the parentheses, you can (2) place the input parameter/arguments.
After that, the first statement can be an (3) optional statement: the documentation string (or ‘docstring’). The code block within the function then (4) starts with a colon (:).
After this, the function is exited by using the statement return and hopefully passes an expression (solution to the problem) to the user.
In short:

def function_name():

Defining a function does not mean that it is actually executed. In order for this to happen, the user has to call the function, as seen in my last blog post.
This time I will try to exemplify how functions are defined/created and then called by using another calculator program (just as in my Project 7). But this time, the functions are defined.
Have a look:

Bildschirmfoto 2016-09-15 um 00.19.35.png

In the part above, which is the beginning of our calculator.py program, all we do is define the functions. This is done by following the steps described earlier. When the function is defined you can decide what should happen to your parameters in the “return” step. For each mathematic operation used in this program we code  x + or – or * or /.
Let’s have a look what happens when these functions are called later:
Bildschirmfoto 2016-09-15 um 00.42.23.png

In the leftover part, the program first asks the user to decide which kind of operation he/she would like to complete. By using the built-in function ‘input’, a number between 1 and 4 can be entered and is then “saved” in our “choice” variable. The program then uses an if, elif and else operator. These operators will be explained later on in my blog.
What is important to note is that once the choice has been done the program selects the two numbers to be calculated from the user. After collection of the numbers, the program automatically prints the calculation and most importantly also calls the defined function from part 1 and prints this at the end of the statement.

I hope this helped you to understand better how to define functions. As of this point, I am not too familiar with the different possibilities I have when defining functions but I hope to get better at this within the next weeks.
For another good example and really step-by-step explanation please visit THIS BLOG POST.

As always, if there are any questions remaining, please don’t hesitate to write me via Twitter or comment on this post. 🙂

Best,
@tecjames


Sources:
http://www.programiz.com/python-programming/examples/calculator
http://www.tutorialspoint.com/python/python_functions.htm

Project 7: Calling (Built-In) Functions

Functions come up in every programming language. By using functions, a programmer is able to structure his/her program better because it enables them to write a code that can be used many times within the program (“block of organized, reusable code”). In that sense, it simplifies your program and once you are able to include functions within a program your programs not only looks better, but also gets more ‘simple’!
          *** (Remember Rule 3:’Simple is better than complex’, Zen of Python). ***

For the sake of this blog post I will only cover the main part of calling functions, because my next project will be about defining functions ourselves and then being able to call these. There are many functions installed within Python and are always available to be called by the program. This list was taken from the Python website itself and I hope it includes all the latest functions available (as Python sometimes adds/deletes functions):

Bildschirmfoto 2016-09-14 um 23.29.02.png

To explain all of these functions would take a long time, but if you are curious to see what the other functions do (those I don’t use in this post) please click !!HERE!!

When calling a function you should code this:

function_name (parameter)

The Function_name identifies which function it is that you want to use & parameters are the values you give the function. When called, the function uses the parameter to solve the problem assigned to it.

I will try to explain how functions are called by using a calculator program I found really helpful. To exemplify how functions are called please look at the program below:

Bildschirmfoto 2016-09-15 um 00.00.27.png

In the program above, the built-in function “input” is used in order to “store a value” and use it later in your code. The programmer is able to use the input functions repeatedly, in order to store different values in the object you give them (e.g. ‘add1’, ‘sub2’ etc.). Additionally, also the “print” function is an example of a function built-in which we have been using from the first day of class onwards.

Just as you have seen it with the built-in print() function, your own functions can execute tasks that you give to them in the ‘define’ (def) step. This will be explained thoroughly in my next blog post.

If you have any questions just hit me up! 🙂
(@tecjames)


Sources:
http://sthurlow.com/python/lesson05/
http://www.tutorialspoint.com/python/python_functions.html

Project 6: Basic Types & Their Use – Part II

Today I will complete the mastery topic of the basic types there are in Python. Please make sure to comment of write me via Twitter (@tecjames) if you have any questions about this.

  • Lists

Lists in Python are awesome because, compared to other software languages, a list can contain items of different types and Python keeps track of the datatype internally.
Lists within Python are assigned several items separated by commas (,) and the whole list is enclosed by square brackets ([]). You can then easily print either the whole list or different parts of the list (denoting print(my_list) or print(my_list[2] ). See how this works below:

bildschirmfoto-2016-09-12-um-17-07-31

bildschirmfoto-2016-09-12-um-17-08-12

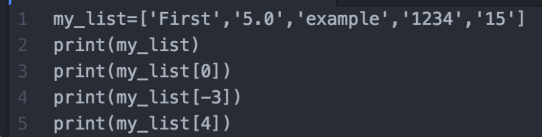
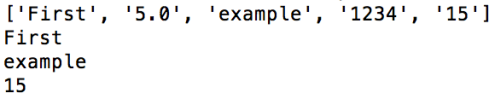
When choosing the value 0 to print, Python will always use the first item in your list, as lists are zero-based. When choosing to print out e.g. [-3], Python will count “backwards” and (making use of my program) display “example”.

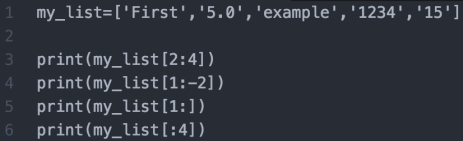
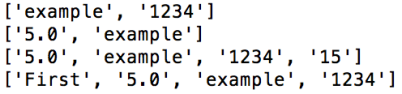
The values can be accessed using a so-called slice operator ([]) and ([:]). Thus, you can choose to only print specific parts or “slices” of your created list. When writing e.g. print(my_list[1:4]), the output will include a new list, starting with the first item called (1) up to, but not including the second value (4).Similarly, other possible options can be handled easily. Have a look below to see these rather straightforward prints.

bildschirmfoto-2016-09-12-um-17-20-26

bildschirmfoto-2016-09-12-um-17-20-43

There are many more things you can do within the list type. If you would like a better idea of how lists can be used apart from what I have covered, please visit this LINK covering also how to add or remove items or how to search for values within a list.

  • Tuples

A tuple is similar to a list. The main difference to normal lists as covered before is, that tuples cannot be changed once they are created. Apart from that a tuple is created in the same way and can also be called using the slice operator. The methods available for lists like append(), extend(), insert() or remove() cannot be used with tuples.
Why do we use tuples then?
Well, tuples are faster and safer to use within your code and they can be used as dictionary keys.
By using the list() or tuple() functions, lists can be easily converted into tuples and vice-versa.

  • Sets

A set can be defined as an ‘unordered bag of unique elements’. A set can contain values of any immutable data types (Numeric types (int, float, complex), String, Tuple, frozen set & bytes). But, compared to lists, sets are unordered and cannot contain duplicates of elements.)
[For more information on mutable and immutable data types please visit THIS site]
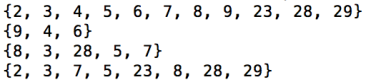
How to create a set is quite straightforward. This is done as follows:

bildschirmfoto-2016-09-13-um-14-48-14

bildschirmfoto-2016-09-13-um-14-48-34

To add values to a set, one can use the add or update method. In the program above this would mean you could either write my_set.add(3) (for single elements added) or you could choose to write my_set.update([3,4,5]) for multiple values.You can delete items off a set through using either my_set.discard(3) or my_set.remove(3). You can ask Python if a certain value is within a list by using the “in” operator (e.g. 1 in my_set –> True).

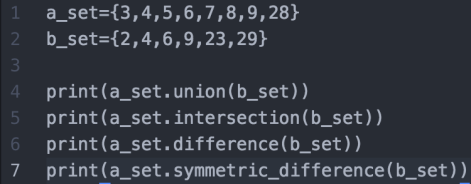
  • Sets can perform different operations like intersections, union, difference and symmetric difference. With union, you are able to check which items are in either set and with intersection you can check which items are in both sets. Additionally, difference allows you to display all elements within a_set but NOT in b_set and symmetric_difference, returns a new set containing all elements that are in exactly one set.

bildschirmfoto-2016-09-13-um-15-18-14

bildschirmfoto-2016-09-13-um-15-17-18

  • Dictionaries

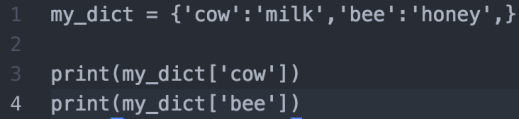
A dictionary is an unordered set of key-value pairs, meaning that we pair e.g. the word ‘cow’ (key) with ‘milk’ (value). Once the dictionary is set up, you can look up values by their keys (doesn’t work the other way around). A dictionary is set up as follows:

bildschirmfoto-2016-09-13-um-15-38-17

bildschirmfoto-2016-09-13-um-15-37-46

If you wish to change a key-value pair, make use of this:

bildschirmfoto-2016-09-13-um-15-42-47
Dictionary values can be any type (integers, booleans or other dictionaries). For keys of dictionaries, you can use less, namely integers, strings and few other types.

______________________________________________________________

By covering lists, tuples, sets and dictionaries, together with my last blog post, I believe to have written about all main types that are used within Python.
PLEASE LET ME KNOW if this list is incomplete and I will gladly add another blog post regarding another type.

Let me know if you have any questions!! (@tecjames)

Best,

James


Sources:

http://www.diveintopython3.net/native-datatypes.html
Python Objects: Mutable vs. Immutable
https://www.dotnetperls.com/set-python
https://www.tutorialspoint.com//python/python_variable_types.htm